I have been home three weeks now after time away, missing the three weeks of heat wave temperatures of over 40DegC. Decided to have a running session, or a shunt session, as usually I only use the bottom section, and shunt grain wagons at my silo complex. this is because the drop in area across the garage door is heavy (needs to be redesigned).
It was when I was operating a shunt, I noticed something not quite right with the upper station area. The area of laid ballast had cracked severely, the area of hard stand in front of the goods shed:which had been laid on foam board; the top layer of paper had lifted away from the foam. (This is the result of heat. The garage is probably not the best spot to built a model rail lay-out).
So I hit the track with large amounts of water, and started to carefully lift (which was not too hard).
by the end of the day, the effected ballast was gone, and most of the track relayed, and rewired. Plus the mess had been cleaned away.
The photos show the after effects, with the ballast cleaned away. The bricks a weighting down some re-glued cork, and the water spray bottle is where the hard stand used to be. Some repair work needs to carried out on the bridge ( just as well not all the steel beams had been put in!).
A blog that deals with the Adelaide to Melbourne main railway line, in prototype, and to modelling somewhere in Victoria.
Dimboola
Dimboola station. This great photo was taken by my son Craig
Sunday, 23 February 2014
Wednesday, 5 February 2014
Periodical New Zealand post
Having returned from three weeks in the Canterbury region of the South Island, (and having missed some of the hottest weather in SA recorded history), managed to catch some rail action on the Midland Line. Not just coal trains this time, as I was out to photograph Kiwi Rail's superb new coaching stock, now running on all three passenger trains. I concentrated on the Tranz Alpine service, as it passed close to where I was staying.
A standard Tranz Alpine consist rapidly passing through Darfield with new coaching stck, heading for Springfield, where the train makes a stop for about ten minutes.
The Tranz Alpine departing Springfield. The DXC class used on this train re the only ones allowed, as all have had fire extinguishing equipment installed, in case they should catch fire passing through the Otira tunnel. (This resulted from the Pike River mine explosion inquiry).
The AK and AKC carriages, were the last items of rolling stock to be built by Hillside Engineering workshops, in Dunedin.
The other train a must to view, are the WP trains on the timetable, that all service the huge Fonterra Milk factory just out of Darfield. There is one milk powder container train on each morning, except Sunday, and a containerized coal train. These are scheduled for each day, except Sunday, but only run as required.
Containerized coal arrived from, Christchurch. These boxes are loaded on the West Coast, railed across the Alps to Middleton depot, then back to Darfield, as the siding into Fonterra is only one way.
Monday afternoon, and the extra loading is shipped out from the factory. The locos came down from Springfield and attached to the consist that was waiting on the Fonterra siding. All of this is visible from the highway and access road to the plant, as there is a massive lawn area on the factory side of the track. All these containers are bound for China.
If visiting the area, beware, that there are road milk tankers everywhere, especially during the mornings.
A standard Tranz Alpine consist rapidly passing through Darfield with new coaching stck, heading for Springfield, where the train makes a stop for about ten minutes.
The Tranz Alpine departing Springfield. The DXC class used on this train re the only ones allowed, as all have had fire extinguishing equipment installed, in case they should catch fire passing through the Otira tunnel. (This resulted from the Pike River mine explosion inquiry).
The AK and AKC carriages, were the last items of rolling stock to be built by Hillside Engineering workshops, in Dunedin.
The other train a must to view, are the WP trains on the timetable, that all service the huge Fonterra Milk factory just out of Darfield. There is one milk powder container train on each morning, except Sunday, and a containerized coal train. These are scheduled for each day, except Sunday, but only run as required.
Containerized coal arrived from, Christchurch. These boxes are loaded on the West Coast, railed across the Alps to Middleton depot, then back to Darfield, as the siding into Fonterra is only one way.
Monday afternoon, and the extra loading is shipped out from the factory. The locos came down from Springfield and attached to the consist that was waiting on the Fonterra siding. All of this is visible from the highway and access road to the plant, as there is a massive lawn area on the factory side of the track. All these containers are bound for China.
If visiting the area, beware, that there are road milk tankers everywhere, especially during the mornings.
Monday, 23 December 2013
Dooen, finally the new Horsham freight terminal.
The Wimmera Intermodal Freight Terminal at Dooen now has four train movements per day. Two, WCL/SCT in and out to Melbourne, and two QUBE in and out to Melbourne; after and agreement was reach recently in Novemeber, with WCL over access to the terminal by QUBE.
Both trains are currently hauled by GL class locomotives, on hire from CFCLA. This is while the SCT, CSR locomotives are out of action, due to asbestos removal.
QUBE Logistics container movements are now from the nearby Viterra terminal to WIFT, and by rail, instead of been road hauled through to Melbourne, after QUBE ceased rail operations from the old Horsham yard about half way through 2013.
Dooen terminal is about ten kilometres from Horsham. The main line is just to the right, in the above photograph, and this is where the terminal spur also connects.
Here is some action from the Stawell rail Cam
http://www.youtube.com/watch?v=O-wER_ImR-k
http://www.flickr.com/photos/stawellwebcam/11505416664/
Both trains are currently hauled by GL class locomotives, on hire from CFCLA. This is while the SCT, CSR locomotives are out of action, due to asbestos removal.
QUBE Logistics container movements are now from the nearby Viterra terminal to WIFT, and by rail, instead of been road hauled through to Melbourne, after QUBE ceased rail operations from the old Horsham yard about half way through 2013.
Dooen terminal is about ten kilometres from Horsham. The main line is just to the right, in the above photograph, and this is where the terminal spur also connects.
Here is some action from the Stawell rail Cam
http://www.youtube.com/watch?v=O-wER_ImR-k
http://www.flickr.com/photos/stawellwebcam/11505416664/
Sunday, 15 December 2013
Building a SCT's PQFY
Something must be wrong! I have 99% completed two models recently. This time it is a PQFY in line fuel tanker for SCT. SCT services across Australia all haul a PQFY wagon directly behind the locomotives. This means that SCT does not have to stop on the Nullabor, and pay for fuel from a competitor, at their prices. Originally they used VTQF tank wagons from freight Australia, but when these came under Pacific National, SCT and Liquip International, developed their own inline fuel system, involving twin TILU 30' 35000litre tanks on ex Commonwealth Railways RMX container flats.
I began by scratch building the wagon. I used drawings of the Mechanical Handling version: first batch, built 1968; obtained from Inprotrans, a while ago. (Note: that there are minor difference between the wagons, depending on their manufacturer. The oval hole version was built by Commonwealth Engineering in 1969). The wagon was painted red, with a grey deck, and fitted with Auscision 70t ride control bogies.
The tanks came from DSAutoModelle, via ebay (they also have a online shop). I purchased the cheapest 30' tanks with red frame work they had. These were sand back to remove the unwanted European Owner markings, then painted white. The walkways were cut back to only leave a top inspection plate.
The pump unit was built from pieces of plastic and brass wire, follow a near enough arrangement from photos viewed from other sources, and attached to the tanks with some black coated wire.
Now just await a couple of SCT EDI GT46C-ACE's; probably due during 2014, and not from source that has been advertised.
I began by scratch building the wagon. I used drawings of the Mechanical Handling version: first batch, built 1968; obtained from Inprotrans, a while ago. (Note: that there are minor difference between the wagons, depending on their manufacturer. The oval hole version was built by Commonwealth Engineering in 1969). The wagon was painted red, with a grey deck, and fitted with Auscision 70t ride control bogies.
The tanks came from DSAutoModelle, via ebay (they also have a online shop). I purchased the cheapest 30' tanks with red frame work they had. These were sand back to remove the unwanted European Owner markings, then painted white. The walkways were cut back to only leave a top inspection plate.
The pump unit was built from pieces of plastic and brass wire, follow a near enough arrangement from photos viewed from other sources, and attached to the tanks with some black coated wire.
Now just await a couple of SCT EDI GT46C-ACE's; probably due during 2014, and not from source that has been advertised.
Monday, 9 December 2013
Build a Static grass applicator
How to build a static grass applicator for around AUS$40. First, you need to acquire a negative ion generator from Oatley Electronics. cat No: [IONB2] for around AUS$14 in Sydney. When I purchased mine, they had a credit card limit of $20, so you may have to buy two.
Next, the hardware shop for some 42mm UPVC pipe. My Negative Ion generator is just a bit big, so some careful trimming till it was a tight fit. (They maybe a different size now?)
While at the hardware shop, you need a 40mm cap to fit the UPVC tube, plus some parts from Clipsal.
235S32BSP40 screwed metric converter.
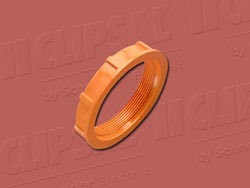
260/32 locking rings
25mm conduit plug.
plus about 100mm of bronze flyscreen.
From Jaycar, you will need:
Switch of choice, for on off control
Alligator clip
9volt battery clip.
Next, you have to find plastic container for the grass fibres. Some supermarkets used to stock a plastic flour shaker (now hard to find, around $5) but Coles have a cooking string container that might work.
Carefully cut a hole in the bottom of the plastic container, just big enough to fit the screwed metric converter. You have place one of the locking rings on the converter, fit through, then add the second locking ring to hold the container in place.
a hole needs to be drilled in the conduit plug, and the pale red silicone coated wire, has to be threaded through. This has to be soldered to the bronze flyscreen. (Do not use the black powdered coated screen as it will not work). Take the containers plastic lid and cut out a hole to fit the flyscreen into. Can glue in if required.
Next, you need the wiring diagram.
http://secure.oatleyelectronics.com/files/IONB2.pdf
You will need two holes in the 42mm handle tube. Wire up battery clip and switch, then insert the ion generator into the tube. There should be two wires coming from the tube, to solder together, and add some length, then the alligator clip.
The converter's plain end, may need packing for a tight fit when inserted into the tube.
Add nine volt battery for around 12KV (Remember: high voltage, and your parts must be plastic, except for the mesh).
Time to test. Add glue to the area and a nail (earth), attach alligator clip to nail, fill container with fibres, turn on, and shake over the area for grass. If all is working fine, the fibres should all be standing upright.
I have used down to 2mm fibres, but, generally I turn on the unit before turning upside down, so the fibres are charged before they fall out.
So there you have it. If you cannot made one for less than $40, then go out and buy the Noch version for around $300, and it will not be as good, as from many photos I have seen, it has trouble charging the fibers to get them to stand upright. There is another unit available from War World Scenics in England: around $200.
If reading this from the UK, I saw this shifter in Barnitts on my travels recently, Even has its own metal screen.
Update September 2024.
Next, the hardware shop for some 42mm UPVC pipe. My Negative Ion generator is just a bit big, so some careful trimming till it was a tight fit. (They maybe a different size now?)
![]() |
| Photo: Oatley Electronics. |
235S32BSP40 screwed metric converter.
260/32 locking rings
25mm conduit plug.
plus about 100mm of bronze flyscreen.
![]() |
| screwed metric converter |
![]() |
| Locking ring |
From Jaycar, you will need:
Switch of choice, for on off control
Alligator clip
9volt battery clip.
Next, you have to find plastic container for the grass fibres. Some supermarkets used to stock a plastic flour shaker (now hard to find, around $5) but Coles have a cooking string container that might work.
Carefully cut a hole in the bottom of the plastic container, just big enough to fit the screwed metric converter. You have place one of the locking rings on the converter, fit through, then add the second locking ring to hold the container in place.
a hole needs to be drilled in the conduit plug, and the pale red silicone coated wire, has to be threaded through. This has to be soldered to the bronze flyscreen. (Do not use the black powdered coated screen as it will not work). Take the containers plastic lid and cut out a hole to fit the flyscreen into. Can glue in if required.
Next, you need the wiring diagram.
http://secure.oatleyelectronics.com/files/IONB2.pdf
You will need two holes in the 42mm handle tube. Wire up battery clip and switch, then insert the ion generator into the tube. There should be two wires coming from the tube, to solder together, and add some length, then the alligator clip.
The converter's plain end, may need packing for a tight fit when inserted into the tube.
Add nine volt battery for around 12KV (Remember: high voltage, and your parts must be plastic, except for the mesh).
Time to test. Add glue to the area and a nail (earth), attach alligator clip to nail, fill container with fibres, turn on, and shake over the area for grass. If all is working fine, the fibres should all be standing upright.
I have used down to 2mm fibres, but, generally I turn on the unit before turning upside down, so the fibres are charged before they fall out.
So there you have it. If you cannot made one for less than $40, then go out and buy the Noch version for around $300, and it will not be as good, as from many photos I have seen, it has trouble charging the fibers to get them to stand upright. There is another unit available from War World Scenics in England: around $200.
![]() |
| Photo of my second spare unit. |
Update September 2024.
The negative ion generators are still available the last time I searched their website. More importantly, I was having trouble getting it to work with fibres greater than 2mm. I purchased a sheet of #4 size stainless mesh. Though the holes are large, I turn on the applicator before turning over, and out come the longer fibres with no trouble.
Saturday, 7 December 2013
Sadleirs' vans
Sadlier Logistic's run a service between Melbourne and Perth, attached to Pacifc National trains. Usually these are ex NSW NLKY vans, recoded to RLSY vans. To confuse matters, they also now use some of older ex NSW KLV vans, also recoded to RLSY. Most of the vans are from the newer NLKY version, and the number on a service varies, see photos below.
I decided that I would add some of these vans to my Pacific National service. Auscision Models, produce both types of van. The earlier KLV van in Sadliers Livery was a single van in a four pack (NLV-9 Sold out) and the NLKY's were produced only in a two tone green, and not the all over Lime green that most now run in. As seen in the bottom photo, they also use un-repainted units.
I wanted a single KLV. Luckily, Ian Storrie, of Ian Lindsay Models, produced a fine kit for the KLV, so I ordered one of those. (Not everything has to be ready to run).
The kit went together extremely well, as you would expect for a Ian Lindsay Model. I painted the unit firstly with a white undercoat from Tamiya Color, then finally with Tamiya TS-22 light green, which gave almost the correct colour. The Sadleirs logo came of there website, reduced to about the right size and printed out on photo paper. (Still have to pick out the door handles, steps and grab rail in white). The bogies are from Auscision, but as the kit was produced to take AR Kit bogies, the height has to be adjusted.
PS. If you have noticed, most of my model photos are taken around my river crossing, and that is static grass in front and behind. I will soon tell how to make a static grass applicator for around $40.
I wanted a single KLV. Luckily, Ian Storrie, of Ian Lindsay Models, produced a fine kit for the KLV, so I ordered one of those. (Not everything has to be ready to run).
The kit went together extremely well, as you would expect for a Ian Lindsay Model. I painted the unit firstly with a white undercoat from Tamiya Color, then finally with Tamiya TS-22 light green, which gave almost the correct colour. The Sadleirs logo came of there website, reduced to about the right size and printed out on photo paper. (Still have to pick out the door handles, steps and grab rail in white). The bogies are from Auscision, but as the kit was produced to take AR Kit bogies, the height has to be adjusted.
PS. If you have noticed, most of my model photos are taken around my river crossing, and that is static grass in front and behind. I will soon tell how to make a static grass applicator for around $40.
Saturday, 16 November 2013
SDS Models Update
SDS Models have announced that their RQBY containers wagons have arrived. More wagons for intermodal services, in both National Rail and Pacific National liveries.
Also announced, (a not so secret model), as I wrote about in my Caulfield SDS update. Engineering sample models of the JCW type 80' container wagons. Finally something to put those 40' TNT containers on, especially as Auscision have just received a re-run of their TNT 40' containers. While these are the NSW version, they are very similar to the VR VQDW and AN AQDW versions. When fully loaded you would not be able to tell the difference in the deck, and a change of bogies, to ride control.
http://www.robx1.net/b501_525/b505_17.jpg
https://blogger.googleusercontent.com/img/b/R29vZ2xl/AVvXsEglvKf2wMiyG89Arc6I4uZIycJ6cKwdyQvjVLagISsLymTwgL3bSIpK8u2nyUtTVL2yvZQONK9_BZC7sCdbI7SrzYX1W9KFNVrHBvnb6i0bVZ9rYA4jPh1B8zk-XOvjAuRt1if_pv6rDUA/s1600/_3-RQNW+Aligned+%28Large%29.jpg
http://railgallery.wongm.com/albums/wagons/pn-maryvale-freight/E104_5589.jpg
This is an update to my update. Further discussion on the web forums have revealed that SDS are producing two more types of container wagons. Under the future release banner there is the following, showing the new to come RACE containers.
It's the wagon on the right, that is of interest, as it has VR XCS bogies, a FQX/VQCX. SDS did all the work for Aust- N-Scale's FQX N scale RTR wagon.
9-3-2014, this wagon was confirmed at the Sandown Model Rail exhibition.The Victorian FQX sample was on display, along with the South Australian version. May we see the variations in the future.
![]() |
| Photo: SDS Models. The two outer wagons are RQBY, the inner, an OCY. |
Also announced, (a not so secret model), as I wrote about in my Caulfield SDS update. Engineering sample models of the JCW type 80' container wagons. Finally something to put those 40' TNT containers on, especially as Auscision have just received a re-run of their TNT 40' containers. While these are the NSW version, they are very similar to the VR VQDW and AN AQDW versions. When fully loaded you would not be able to tell the difference in the deck, and a change of bogies, to ride control.
http://www.robx1.net/b501_525/b505_17.jpg
https://blogger.googleusercontent.com/img/b/R29vZ2xl/AVvXsEglvKf2wMiyG89Arc6I4uZIycJ6cKwdyQvjVLagISsLymTwgL3bSIpK8u2nyUtTVL2yvZQONK9_BZC7sCdbI7SrzYX1W9KFNVrHBvnb6i0bVZ9rYA4jPh1B8zk-XOvjAuRt1if_pv6rDUA/s1600/_3-RQNW+Aligned+%28Large%29.jpg
http://railgallery.wongm.com/albums/wagons/pn-maryvale-freight/E104_5589.jpg
![]() |
| VQDW drawing. |
It's the wagon on the right, that is of interest, as it has VR XCS bogies, a FQX/VQCX. SDS did all the work for Aust- N-Scale's FQX N scale RTR wagon.
9-3-2014, this wagon was confirmed at the Sandown Model Rail exhibition.The Victorian FQX sample was on display, along with the South Australian version. May we see the variations in the future.
Subscribe to:
Posts (Atom)