Dimboola

Dimboola
Dimboola station. This great photo was taken by my son Craig

Monday, 9 December 2013

Build a Static grass applicator

How to build a static grass applicator for around AUS$40. First, you need to acquire a negative ion generator from Oatley Electronics. cat No: [IONB2] for around AUS$14 in Sydney. When I purchased mine, they had a credit card limit of $20, so you may have to buy two.


Next, the hardware shop for some 42mm UPVC pipe. My Negative Ion generator is just a bit big, so some careful trimming till it was a tight fit. (They maybe a different size now?)
Photo: Oatley Electronics.
While at the hardware shop, you need a 40mm cap to fit the UPVC tube, plus some parts from Clipsal.
235S32BSP40 screwed metric converter.
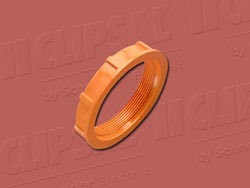
260/32 locking rings
25mm conduit plug.

plus about 100mm of bronze flyscreen.
screwed metric converter
 
Locking ring

From Jaycar, you will need:
Switch of choice, for on off control
Alligator clip
9volt battery clip.

Next, you have to find plastic container for the grass fibres. Some supermarkets used to stock a plastic flour shaker (now hard to find, around $5) but Coles have a cooking string container that might work.

Carefully cut a hole in the bottom of the plastic container, just big enough to fit the screwed metric converter. You have place one of the locking rings on the converter, fit through, then add the second locking ring to hold the container in place.
a hole needs to be drilled in the conduit plug, and the pale red silicone coated wire, has to be threaded through. This has to be soldered to the bronze flyscreen. (Do not use the black powdered coated screen as it will not work). Take the containers plastic lid and cut out a hole to fit the flyscreen into. Can glue in if required.

Next, you need the wiring diagram.
http://secure.oatleyelectronics.com/files/IONB2.pdf

You will need two holes in the 42mm handle tube. Wire up battery clip and switch, then insert the ion generator into the tube. There should be two wires coming from the tube, to solder together, and add some length, then the alligator clip.
The converter's plain end, may need packing for a tight fit when inserted into the tube.
Add nine volt battery for around 12KV (Remember: high voltage, and your parts must be plastic, except for the mesh).
Time to test. Add glue to the area and a nail (earth), attach alligator clip to nail, fill container with fibres, turn on, and shake over the area for grass. If all is working fine, the fibres should all be standing upright.
I have used down to 2mm fibres, but, generally I turn on the unit before turning upside down, so the fibres are charged before they fall out.
So there you have it. If you cannot made one for less than $40, then go out and buy the Noch version for around $300, and it will not be as good, as from many photos I have seen, it has trouble charging the fibers to get them to stand upright. There is another unit available from War World Scenics  in England: around $200.

Photo of my second spare unit.
If reading this from the UK, I saw this shifter in Barnitts on my travels recently, Even has its own metal screen.


Update September 2024.

The negative ion generators are still available the last time I searched their website. More importantly, I was having trouble getting it to work with fibres greater than 2mm. I purchased a sheet of #4 size stainless mesh. Though the holes are large, I turn on the applicator before turning over, and out come the longer fibres with no trouble.  


Saturday, 7 December 2013

Sadleirs' vans

Sadlier Logistic's run a service between Melbourne and Perth, attached to Pacifc National trains. Usually these are ex NSW NLKY vans, recoded to RLSY vans. To confuse matters, they also now use some of older ex NSW KLV vans, also recoded to RLSY. Most of the vans are from the newer NLKY version, and the number on a service varies, see photos below.


I decided that I would add some of these vans to my Pacific National service. Auscision Models, produce both types of van. The earlier KLV van in Sadliers Livery was a single van in a four pack (NLV-9  Sold out) and the NLKY's were produced only in a two tone green, and not the all over Lime green that most now run in. As seen in the bottom photo, they also use un-repainted units.
I wanted a single KLV. Luckily, Ian Storrie, of Ian Lindsay Models, produced a fine kit for the KLV, so I ordered one of those. (Not everything has to be ready to run).


The kit went together extremely well, as you would expect for a Ian Lindsay Model. I painted the unit firstly with a white undercoat from Tamiya Color, then finally with Tamiya TS-22 light green, which gave almost the correct colour. The Sadleirs logo came of there website, reduced to about the right size and printed out on photo paper. (Still have to pick out the door handles, steps and grab rail in white). The bogies are from Auscision, but as the kit was produced to take AR Kit bogies, the height has to be adjusted.

PS. If you have noticed, most of my model photos are taken around my river crossing, and that is static grass in front and behind. I will soon tell how to make a static grass applicator for around $40.

Saturday, 16 November 2013

SDS Models Update

SDS Models have announced that their RQBY containers wagons have arrived. More wagons for intermodal services, in both National Rail and Pacific National liveries.

Photo: SDS Models. The two outer wagons are RQBY, the inner, an OCY.

Also announced, (a not so secret model), as I wrote about in my Caulfield SDS update. Engineering sample models of the JCW type 80' container wagons. Finally something to put those 40' TNT containers on, especially as Auscision have just received a re-run of their TNT 40' containers. While these are the NSW version, they are very similar to the VR VQDW and AN AQDW versions. When fully loaded you would not be able to tell the difference in the deck, and a change of bogies, to ride control.


http://www.robx1.net/b501_525/b505_17.jpg

https://blogger.googleusercontent.com/img/b/R29vZ2xl/AVvXsEglvKf2wMiyG89Arc6I4uZIycJ6cKwdyQvjVLagISsLymTwgL3bSIpK8u2nyUtTVL2yvZQONK9_BZC7sCdbI7SrzYX1W9KFNVrHBvnb6i0bVZ9rYA4jPh1B8zk-XOvjAuRt1if_pv6rDUA/s1600/_3-RQNW+Aligned+%28Large%29.jpg

http://railgallery.wongm.com/albums/wagons/pn-maryvale-freight/E104_5589.jpg

VQDW drawing.
This is an update to my update. Further discussion on the web forums have revealed that SDS are producing two more types of container wagons. Under the future release banner there is the following, showing the new to come RACE containers.


It's the wagon on the right, that is of interest, as it has VR XCS bogies, a FQX/VQCX. SDS did all the work for Aust- N-Scale's FQX N scale RTR wagon.

9-3-2014, this wagon was confirmed at the Sandown Model Rail exhibition.The Victorian FQX sample was on display, along with the South Australian version. May we see the variations in the future.

Unit48.com containers part 2

A week has passed and out again to catch the 6MP7 passing through Mount Barker Junction; usually around 10.15 in the morning. How another week can be different. On arrival, all the signals were blank, before turning red: meaning something was stop in the loop. Then the sound of throbbing GM's coming up the hill with a return grain, coming to  a halt into the loop. Three GM's and two class 22's. (Some of these were on an empty I saw on last Tuesday, that had five GM's: three in orange and two green units, and a class 22).


The grain had been pulled into the loop to allow 6MP7 Pacific National Trailerail service to pass (running late). Up front were two 93 class (9313 and 9312) and trailing NR13.


Only two Unit48.com dry boxes, and a few curtain sided containers. More unusual, was the five pack well wagon set in the middle of the consist.


Friday, 8 November 2013

Unit48.com containers

Unit48.com is an Australian  subsidiary of the Dutch based Unit45.com container company. In association with  Freightquip Australia, they now provide both curtainsided and drybox 48' units for the Australian market. Unit45 is Europe's leading innovator in the creation and manufacturer of container solutions.
In Europe, where the 45' unit is more common, as it provides better specifications in the loading of pallet cargo, while here in Australia the 48' is more common.
I first saw a photo of one on Wagonfreak's blog back in June. A chance today, to get out and see 7MP7 Trailerail, and there they were. About 10% of the train.


Wednesday, 30 October 2013

Horsham yard closes.

On November 1st, 2013, the freight yard at Horsham railway station, was closed to all freight traffic for ever. Victrack will decommission the yard when QUBE relocate to a road terminal at Dooen. There has been no rail freight out of the terminal for many months, and the Overland only stops twice weekly in each direction.
Community consultation now begins on what to do with the site; though, the council has indicated that the site is probably heavily contaminated, and the cost of clean up will restrict  any possible redevelopment of the site.
Most of the track in the yard will probably be removed, and as for the future of the goods shed, will it go the same way as the freight gate, whose foundations, are the yellow concrete pads in the above photo?

QUBE packing up to leave.

http://www.flickr.com/photos/60627979@N02/10585442494/


All that remains, is poor 7334, still sitting at the end of the yard, as shown when IEV100 visited the yard in December 2013.

http://www.flickr.com/photos/60627979@N02/11197686973/in/photostream/


Monday, 21 October 2013

Containers. How are they made?

http://www.youtube.com/watch?v=z7l6AQN1KV0

The attached Youtube video was produced by Big steel Box, and shows how a container is made.